White Line Disease in Horses: Causes, Treatment Timeline, and Prevention
- Horse Education Online

- Aug 29
- 14 min read
Updated: Sep 2

White line disease in horses is a quiet, mixed fungal/bacterial invasion of the inner hoof wall (laminar zone) that undermines the wall from the inside. It’s often confused with seedy toe or thrush, but the clues differ: chalky/cheesy horn right at the white line, a hollow tap over the wall, and a toe or quarter flare that keeps coming back. Left alone, it invites repeat abscesses and even partial wall collapse.
This guide gives you a fast diagnosis checklist, a day-by-day treatment timeline with shoeing setups, and a printable prevention checklist with a landscape Reset Tracker.
At-a-Glance
What it is: Microbial invasion of the inner hoof wall at the white line.
Spot it: Chalky white line, hollow tap, toe or quarter flare.
Differentiate: Not thrush which lives in the frog and smells, not simple seedy toe which is a small toe cavity.
Confirm: Debride to hard horn; take radiographs if lameness is moderate, the pocket is tall or wide, the coronet swells, or abscesses repeat.
Fix: Debride → dry antiseptic pack daily → keep clean and dry.
Shoeing: Rear-set breakover, wide-web or rim support, clips or glue; consider bar shoes if load sharing is needed.
Timeline: A 15–20 mm pocket typically needs 8–12 weeks; larger defects often take 3–4 months.
What is white line disease?
White line disease in horses is an infection of the inner hoof wall–laminar interface. Organisms enter through small separations at the white line and then eat their way upward behind the outer wall where oxygen is scarce and the horn is softer. Think of it as undermining—the outside can look okay while a hidden pocket grows inside.
Owner tip: If you tap the hoof wall with a metal tool and hear a hollow sound over one area, it may indicate an undermined pocket beneath an otherwise normal-looking wall.
Where it lives: the non-pigmented inner hoof wall / laminar interface
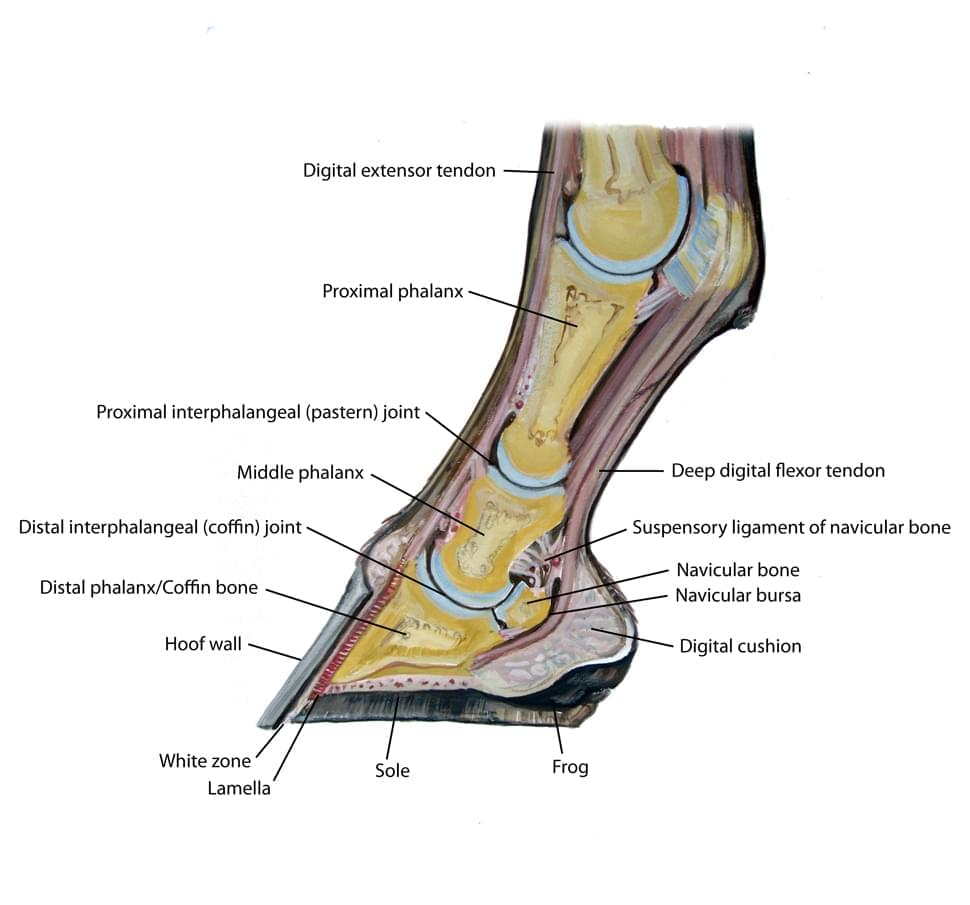
The “white line” you see on the bottom of the foot is really the junction between the outer wall and the sole.
WLD tracks upward within the non-pigmented inner wall (stratum internum/laminar zone) where horn is less dense.
Because this space is tucked behind the wall, it shelters microbes and limits airflow—perfect for slow, hidden progression.
Organisms involved (mixed fungal/bacterial) and why they thrive
Most cases are mixed infections: fungal hyphae plus opportunistic bacteria.
They thrive in low-oxygen pockets behind the wall, moist-then-dry cycles, and areas with trapped debris that keep the horn damp.
Once inside, these organisms create cheesy, chalky, or crumbly horn that no longer carries load.
Farrier tip: If the horn feels like styrofoam or a dry cheese texture under your knife, keep debriding until you reach hard, waxy horn that “rings” under the blade.
How it differs from seedy toe and thrush (location, smell, texture)
Condition | Main Location | Smell | Texture/Look | Pain Level (typical) | Quick Owner Check |
White line disease | Inner wall/laminar interface behind the wall | Mild to none | Chalky, cheesy horn; undermined wall; hollow sound on tap | Often mild unless abscessing | Tap test for hollow zones; probe white line gently |
Seedy toe | Toe region of the white line; can be a localized form of wall separation that may become infected | Mild | Cavity at toe that collects debris | Usually mild | Clean out toe; look for cavity that refills with grit |
Thrush | Frog sulci (especially central sulcus) | Strong odor | Black, greasy discharge; tender frog | Variable; frog can be sore | Pick frog; note odor and black paste |
Learn more about true thrush and why it loves deep sulci in our guide: Thrush—What Is It Really?
Seedy toe can exist without infection, but when microbes colonize the separation it behaves like a localized WLD at the toe.
Risk factors and how cases start
White line disease almost always begins with a gateway—a small separation, over-leveraged wall, or defect that lets microbes in—then it accelerates under the right conditions. Here’s what stacks the deck:
Conformation and mechanics
Long toe / delayed breakover → the toe acts like a long lever, prying the wall away at the white line every step. See What is Breakover for the biomechanics and how to bring it back under the limb.
Under-run or sheared heels → uneven loading and micro-separations at quarters.
Toe or quarter flares → flared wall loses tight connection, inviting grit and moisture to creep in.
Environment and management
Wet–dry cycles (spring mud then hard summer footing): horn swells then shrinks, creating micro-cracks.
Packed debris (arena fines, manure, gravel) at the white line provides constant moisture and food for microbes.
Irregular trim cycles (stretching past 6–8 weeks) allow leverage and flares to rebuild.
Events that open the door
Shoe loss or loose clenches that fret the wall.
Old nail holes that become wicks for moisture and microbes.
Wall cracks or quarter cracks that tunnel upward. If you’re seeing vertical defects, review Quarter Cracks: Causes, Treatment, and Prevention.
Quick risk-to-action table
Risk factor | Why it matters | What to do next (owner + hoof-care team) |
Long toe / delayed breakover | Increases white line leverage at each step | Ask your farrier to set breakover back and dress the toe; see Breakover |
Under-run/sheared heels | Uneven loading causes quarter separations | Shorten trim cycle, balance heels, consider support shoeing |
Wet–dry cycles | Swell-shrink weakens horn and opens micro-gaps | Provide dry standing area; pick feet daily; avoid prolonged mud |
Packed debris at white line | Feeds and hides microbes | Daily picking, periodic white line flush after rides |
Old nail holes | Capillary paths for infection | Rotate nail patterns; consider glue-ons during rehab |
Shoe loss / loose nails | Tears and frets wall | Use bell boots for overreachers; address fit and traction choices |
Irregular trim schedule | Flares and separations rebuild | Aim for 4–6 week cycle; photo the toe each visit to monitor flare |
Numbers that help: Hoof wall grows about 8–10 mm per month. If a pocket is 2 cm high, you’re looking at 2–3 months of disciplined management while solid wall grows down—faster with excellent mechanics and environment.
Early signs owners miss
White line disease in horses usually starts quietly. Catching it before a large pocket forms saves you months of rehab.
The quick-at-home screen (takes 60 seconds)
Pick the foot clean. Focus on the junction where sole meets wall.
Look for chalky or cheesy horn right at the white line, especially at the toe and quarters.
Tap-test the wall with a hoof pick or small hammer: a hollow sound over one zone can mean an undermined pocket.
Check digital pulses at the back of the fetlock: compare left vs right. “Equal and soft” is normal; a warmer, stronger pulse on one side suggests irritation. See The Horse’s Vital Signs for normals and how to assess.
Watch a few walk steps on firm ground. A subtle toe-first landing, shortened stride, or persistent toe flare are common early flags.
What you might notice first
Early sign | What it means | What to do this week |
Chalky / crumbly white line that refills with grit | Microbes are colonizing the inner wall | Clean daily; schedule a trim; avoid wet–dry swings |
Hollow wall sound on tap over toe or quarter | Possible undermined pocket behind the wall | Book farrier exam; avoid rocky rides until checked |
Toe or quarter flare that keeps returning | Leveraging is prying the white line open | Ask to set breakover back and dress flare next visit |
Warm hoof capsule and stronger digital pulse in one foot | Local inflammation; may precede abscess | Stall on dry footing, monitor twice daily, call your hoof-care pro |
Toe-first landing or mild “off” at trot | Horse is unloading sore heels or toe | Soft footing only; evaluate trim mechanics soon |
Owner tip: Hoof wall grows 8–10 mm per month. If the crumbly zone is 10–15 mm tall, plan for 6–8 weeks of careful mechanics and hygiene so solid wall can replace it.
For a structured lameness self-check (grading, trot-ups, circles), see our Comprehensive Guide to Equine Lameness.
Diagnosis and when to image
A good diagnosis answers two questions:
How far has the pocket undermined the wall?
Is deeper anatomy (coffin bone, laminae) at risk or involved?
In-hand exam and mapping (farrier + owner)
Clean and dry the sole. A stiff brush reveals the true white line.
Probe gently at the white line with a hoof pick or loop knife. Stop at hard, waxy horn—do not chase into sensitive tissue.
Hoof testers: note tenderness at toe vs quarters; compare to the other foot.
Map the pocket: use a Sharpie on the sole to outline any undermined area found at the white line. Mark the wall externally over corresponding zones.
Percussion/tap test: confirm any hollow segment of wall.
Safety note: Debridement that creates a “window” through the wall should be done by your farrier with vet backup as needed. The goal is to remove only non-viable horn so oxygen and treatment reach the pocket—not to invade live tissue.
When radiographs help
Get lateral and dorsopalmar radiographs before aggressive debridement if any of the following are true:
Indication to image now | Why |
Lameness ≥ Grade 2/5 or recurrent abscessing | Rule out deeper solar infection or bone involvement |
Undermined wall suspected > 1/3 of wall thickness or spanning multiple quarters | Define the vertical height and load-bearing risk |
Distorted toe capsule / large flare that won’t reduce | Assess breakover position and any coffin bone remodeling |
Heat, swelling, or drainage near the coronary band | Look for ascending tract or gas shadows |
History of laminitis or metabolic risk | Confirm P3 position and sole depth before setting aggressive mechanics |
Radiographs help your team:
Gauge how high the defect travels.
Decide how much wall can safely carry load.
Plan shoeing mechanics (rear-set breakover, support coverage, clips or glue).
Set a baseline to compare in 4–8 weeks.
Differentials to consider (so you don’t chase the wrong problem)
Looks like WLD… but | Clues that redirect |
Subsolar abscess | Acute, more painful; bounding pulses, rapid onset; relief after drainage |
Mechanical wall separation without infection | No chalky horn, no odor; improves quickly once leverage is corrected |
Thrush | Odor and black paste in frog sulci rather than the white line |
Keratoma (tumor of the hoof horn) | Firm mass effect, chronic distortion, and characteristic radiographic lucency—vet diagnosis |
Decision rule of thumb: If the wall sounds hollow and the white line probes crumbly, treat as equine white line disease and plan for mechanics + controlled debridement + antimicrobial packing. If pain is disproportionate or swelling tracks to the coronet, image early.
Step-by-step treatment timeline
White line disease heals when you remove dead wall, keep the pocket dry and oxygenated, and take the lever off the toe/quarters. Here’s a simple, realistic flow.
Day 1 (with farrier/vet)
Debride a “window” through the wall until the horn cuts hard and waxy. Stop before live tissue.
Map and measure the pocket height (mm) and width (mm). Take photos.
Shoe to unload the area: rear-set breakover, wide-web/rim support, and clips or glue if nail purchase is poor. See What is Breakover.
Decide on protection: open window + daily dry packing, covered by a temporary boot or tape wrap.
Days 1–7 (home care)
Daily: pick, dry the window, and pack. Options that stay dry:
Gauze or oakum lightly dusted with copper sulfate (vet-directed).
A dilute povidone-iodine–dampened gauze (let it nearly dry before placing).
Or a commercial white-line/thrush powder per label.
Cover with hoof boot or a short vet-wrap/duct-tape “slipper” for turnout on dry footing.
Hand-walk 10–20 minutes if sound; avoid rocks and deep mud.
Re-photo on Day 3 and Day 7.
Day-by-day (Week 1) cheat sheet
Day | Trim/packing | Work | What to check |
1 | Pro debride; shoe; first pack | Stall + hand-walk | Pain level, shoe security |
2–3 | Replace pack daily | Hand-walk | Odor ↓, horn firmer |
4 | Replace pack | Hand-walk; short turnout (dry) | No new crumbly horn |
5–6 | Replace pack | As above | Heat/pulse normalizing |
7 | Replace pack; photo | Add 5–10 min easy trot if sound | Window edges drying |
Weeks 2–4
Farrier re-check at 2 weeks. Trim back any renewed toe/quarter flare; keep breakover rear-set.
Keep packing every 24–48 h until the pocket walls feel hard and stop crumbling.
Progress work: easy arena trot on good footing; no tight turns on gravel.
Re-photo at Week 2 and Week 4 with a ruler in frame.
Month 2+
If the window is dry and firm, you can taper packing to twice weekly, then stop.
Transition toward normal shoeing as solid wall grows down.
Keep the toe short and breakover back each reset to prevent re-separation.
Photo log every two weeks until the defect has grown out.
How long will it take?Hoof wall grows ~8–10 mm/month. Time to “grow past” a pocket depends on its height from the ground.
Pocket height (from ground) | Wall growth needed | Typical timeline* |
5–10 mm | 1–1.5 months | 4–8 weeks |
15–20 mm | 2–3 months | 8–12 weeks |
25–30 mm | 3–4 months | 12–16 weeks |
*Assumes clean, dry management and correct mechanics.
Red flags (call your vet): increasing heat or digital pulse, new drainage, sudden lameness, coronet swelling.
Shoeing strategies that help
The shoe is a tool to shorten the lever at the toe, spread load off weakened wall, and stabilize the capsule while new horn grows.
1) Set breakover back
Move functional breakover rear-ward under the foot to stop prying at the white line.
Dress the toe and use a shoe with an eased or rolled toe. Full how-to: What is Breakover.
2) Choose support width wisely
Wide-web or rim shoes spread load to stronger wall and sole.
Add quarter or toe clips to reduce wall shear. If nail purchase is poor, use glue-on tabs/cuffs to avoid infected horn.
3) When to use bars
A straight bar or egg bar can share load across the heels when a quarter or toe is compromised.
Start here for use-cases and fit details: Bar Shoes: Common Designs and Uses and Horseshoes: The Egg Bar.
4) Pads, pour-ins, and acrylics
Rigid pads can trap moisture. Use only if the pocket is clean/dry and you can pack/vent.
Urethane pour-ins give uniform sole support behind the toe; do not seal over active, wet infection.

Credit: Americanfarriers Dental acrylic or wall repair is a finishing step once the pocket is dry and the underlying horn is solid.
5) Traction choices
Too much traction can rip a shoe off and tear wall. Pick for footing and discipline. Primer: Horseshoes & Traction.
Quick match-up table
Case profile | Go-to setup | Why it works |
Small toe pocket, firm quarters | Rolled-toe wide-web or rim shoe, rear-set; toe clip | Shorter lever; stabilizes toe |
Quarter pocket, mild lameness | Wide-web with quarter clips; consider pour-in behind toe | Shares load; limits shear at quarter |
Multiple wall defects or poor nail hold | Glue-on cuff/composite with rear-set breakover | Avoids nails in bad horn; strong mechanics |
Large undermining with soreness | Straight bar or egg bar with frog support; careful packing | Spreads load; rests compromised wall |
Photo notes to capture at resets
Front, side, solar view; ruler at toe; mark breakover line on the sole. These make decisions faster next visit.
Rehab plan and monitoring
Rehab is about moving enough to keep circulation while protecting the weakened wall. Progress only when the hoof stays cool, pulses are soft, and the window stays dry.
Work progression (guide, adjust to your horse)
Phase | Work | Surface | Packing |
Days 1–3 | Hand-walk 10–20 min | Dry, level | Daily change |
Days 4–7 | Hand-walk + 5–10 min easy trot (if sound) | Firm, non-gravel | Daily change |
Week 2 | 20–30 min walk, 10–15 min trot sets | Arena footing | Every 24–48 h |
Weeks 3–4 | Add large circles, short ride sets | Good arena, no rocks | 24–48 h, taper if dry |
Month 2+ | Normal flat work; no tight turns on hard ground until solid wall grows down | Varies | Stop when pocket is dry and firm |
What to check, in order
Heat and digital pulse twice daily. Compare to the other foot. If you’re unsure on normals, review Average Heart Rate for a Horse—What’s Normal and How to Check It (useful for post-work recovery too).
Landing pattern. Toe-first landing or shortened stride means back up a phase.
Packing. Replace if damp, smelly, or discolored. Keep the window oxygenated and dry.
Shoe/glue security. Watch clips, cuffs, and clenches after the first ride.
Photo log every two weeks. Same angles each time; include a ruler at the toe.
Simple rehab rule
If any of these show up—warmth, stronger pulse, new tenderness on hoof testers, or fresh crumbly horn—drop back one phase for 3–5 days and re-check.
Prevention checklist (printable)
Keep leverage low, footing dry, and entry points sealed. That’s how you stop white line disease in horses from coming back.
Trim and mechanics
☐ 4–6 week trim cycle; don’t let toe flare rebuild.
☐ Set breakover back under the foot each reset
☐ Balance heels; avoid under-run or sheared heels.
☐ Dress wall flares lightly at each visit so the white line stays tight.
Shoeing and materials
☐ Choose support width for the case (wide-web/rim when needed).
☐ Use clips or glue-ons when nail purchase is poor; don’t nail into compromised horn.
☐ Match traction to footing to avoid shoe loss and wall tears (primer: Horseshoes & Traction).
☐ After shoe loss, inspect old nail holes and pack/seal as advised.
Environment and daily care
☐ Provide a dry standing area; avoid long wet–dry cycles.
☐ Pick feet daily; brush the white line clean after rides.
☐ After heavy rain or deep mud, do an extra white-line check that evening.
☐ Bell boots for over-reachers, especially in turnout or when footing is slick.
Weekly/Monthly quick checks
☐ Tap-test the wall for hollow spots monthly.
☐ Compare digital pulses L vs R after work.
☐ Photo the toe once per month; watch for creeping flare.
☐ Inspect the coronary band for swelling or cracks after hard work (learn the red flags in Coronary Band in Horses).
When to slow down
☐ New heat or bounding pulse.
☐ Fresh chalky horn at the white line.
☐ Soreness after a reset.Back up one phase, refresh packing, and reassess mechanics.
When to call your vet immediately
Call your vet now if any of these show up. White line disease can tip into abscess or deeper infection fast.
Non weight bearing on one foot. Sudden severe lameness often means an abscess or painful wall failure. Stable the horse on dry footing and keep the hoof clean while you wait.
Draining tract or bloody discharge at the sole or coronary band. This can signal an ascending infection that needs imaging and targeted treatment.
Heat plus a bounding digital pulse that does not settle with rest. Compare both front feet. If you also see fever, treat as urgent. Review normals here: The Horse’s Vital Signs.
Coronary band swelling or cracks directly above a known pocket. That line grows the new wall. If it is inflamed, get help before the defect propagates. See basics in Coronary Band in Horses.
Rapidly spreading wall separation or a window that will not dry. You may need culture, radiographs, and a change in mechanics or packing.
Systemic signs like fever, lethargy, or not eating. Pair these with lameness and assume complications until proven otherwise.
Your vet may recommend radiographs to map wall loss, a limited nerve block to localize pain, culture and sensitivity for stubborn pockets, and coordinated farrier work the same day.
Conclusion and next steps
White line disease in horses is a mechanics plus hygiene problem. It heals when you stay on four rails: debride only the dead wall, keep the pocket dry and oxygenated, unload the lever with smart shoeing, and prevent moisture swings and flares.
Use the treatment timeline to guide your first month. Keep photos, measure progress, and reset breakover at every visit. Most pockets resolve on a realistic schedule once the toe lever is gone and the window stays dry.
If you want to go deeper, browse our shoeing primers—What is Breakover, Bar Shoes, The Egg Bar, and Horseshoes and Traction—then keep building your skills with our Study Materials. For structured learning and proof of knowledge, explore our Memberships and Certifications.
When in doubt, loop in your hoof care team early. A small, dry window today beats a months long rehab later.
Keep learning and level up your hoof-care skills
Study materials: flashcards, posters, and more
Books: deep-dive references for your shelf
Memberships: unlock full site access and tools
Certifications: build credentials and prove competency
FAQ
What is white line disease in horses?
It’s a mixed fungal and bacterial infection that enters tiny separations at the white line and undermines the inner hoof wall. The outside can look fine while a hidden pocket travels upward, weakening support and inviting abscesses.
How do you treat white line disease at home?
After your farrier or vet removes all crumbly horn, keep the “window” clean, dry, and oxygenated. Pack daily with a vet-approved dry agent (for example, gauze lightly dusted with copper sulfate or nearly dry povidone-iodine gauze), protect with a hoof boot or short tape wrap, and work only on good footing. The other half of the cure is mechanics: rear-set breakover and stabilizing shoeing so the wall stops prying. See What is Breakover.
How long does it take to heal white line disease?
Hoof wall grows about 8–10 mm per month. A pocket 15–20 mm tall typically needs 8–12 weeks of disciplined care and correct mechanics to grow past, assuming the window stays dry and the toe lever is reduced.
Is white line disease the same as seedy toe?
No. Seedy toe is a localized separation at the toe that may or may not be infected. White line disease refers to microbial invasion that undermines the inner wall, often beyond the toe. Thrush lives in the frog and usually smells strong. For frog problems, review Thrush—What Is It Really?.
Do you need shoes for white line disease?
Often, yes—temporarily. Shoes let you set breakover back, spread load with a wide web or rim, and use clips or glue when nail purchase is poor. Some cases benefit from straight bars or egg bars to share load while new wall grows. Start here: Bar Shoes and The Egg Bar.
Can white line disease come back?
It can if the risks return. Keep a 4–6 week trim cycle, hold the toe short with rear-set breakover, provide dry standing areas, manage nail holes fast, and choose traction wisely to avoid shoe loss. See Horseshoes & Traction.


Comments