
The Pacific Coast Horseshoeing School Trimming and Shoeing Guide
- Horse Education Online

- Aug 20, 2025
- 10 min read
Updated: Aug 22, 2025
This guide was created by the Pacific Coast Horseshoeing School to serve as a clear visual and written reference for students learning the fundamentals of trimming and shoeing horses. Its purpose is to help new farriers visualize each step of the process, from the initial trim to the application of the shoe, and to establish a consistent standard that all beginner students are expected to meet.
As you study the pictures and explanations, understand that these represent the baseline expectations for entry-level farriers in training. The techniques shown reflect proven, practical methods that provide a safe and effective foundation. More advanced or experienced farriers may use different approaches, refine their methods over time, or adapt techniques depending on the horse’s needs and circumstances.
This protocol is not intended to represent the only “correct” way to trim and shoe a horse, but rather the educational standard for beginners at Pacific Coast Horseshoeing School. By following these steps and holding yourself to this standard, you will build the skills, discipline, and eye for detail that will allow you to grow as a professional farrier.
Recognizing landmarks: know where you are to find out where you're going
The trimming and shoeing system presented here emphasizes one central principle: consistency. Students are taught to identify and rely on the natural landmarks within the hoof, as these landmarks guide decision-making and ensure accuracy. By consistently using these markers, farriers develop both confidence and precision in their work.
At the heart of this system is the understanding that when we trim a horse’s hoof, our goal is to bring the outside, insensitive structures into alignment with the inner, sensitive structures. This alignment supports the horse’s comfort, balance, and long-term soundness, while also training farriers to think critically about the anatomy and function of the hoof.


Removing Shoes
Cutting Clinches
1. Bring the hoof forward on the hoof stand.
2. Place your clinch-cutter immediately below the clinch. The clinch-cutter should be initially positioned at a 90-degree angle, perpendicular with the hoof wall.
3. Hit your clinch-cutter with a rubber mallet. As you hit, slowly decrease the angle you’re holding the clinch-cutter at. This will allow you to slip under the clinch to lift it and cut it.
4. You may only rasp the clinches off on horses that are too sensitive for the clinches to be properly cut. If you are rasping clinches off, be careful not to overly rasp the hoof wall, especially on thin-walled horses.
The pictures below show how your clinch-cutter should move as you hit it with the rubber mallet, how you should hold your tools, and the difference between a cut and an un-cut clinch.


Pulling Shoes
1. With your pull-offs, grab the shoe by either heel and pull down towards the toe, following the direction of the collateral sulcus and frog.
2. Once the shoe starts to lift on the first heel, stop. Grab the opposing heel with your pull-offs, and perform step 1 again.

3. Once the shoe has lifted at the heel on both sides, grab the shoe again with your pull-offs at the widest point of the hoof. Pull down towards the toe, following the direction of the collateral sulcus and frog.

4. With your pull-offs, grab the shoe at the toe. One downward motion should fully remove the shoe.

Additional care should be taken when pulling shoes with clips, or when pulling shoes on horses who are sensitive, thin/weak walled, or suffering with white line disease. Pulling a shoe too aggressively, or pulling a shoe incorrectly by pulling side-to-side rather than in a downward motion towards the toe, can result in the hoof wall breaking off.

You may remove the nails one by one with your nail-pullers if the shoe is not coming off easily by following the steps above.
Trimming
Trim protocol
1. Use the hoof pick to clean out any dirt from collateral sulci, central sulcus and sole.
2. Use the wire brush to scrub the entire solar aspect of the foot, as well as the heels all the way back to the bulbs.
Why: You cannot safely and correctly trim a foot with dirt and manure in it. Debris will hide important landmarks of the feet, and will quickly ruin your tools.


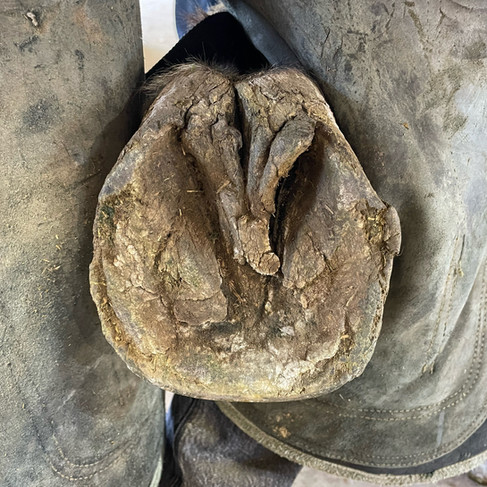
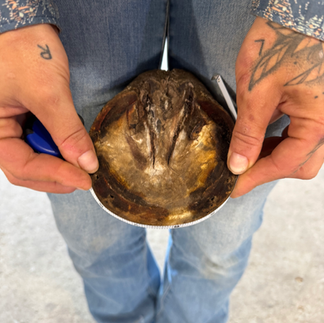
3. With your knife, trim the apex of the frog. You are not looking to remove large amounts of frog: the goal is to uncover the area where the frog and sole meet and blend together. That is the "bottom" of the hoof.
Why: Trimming the apex of the frog allows you to determine the true depth of the hoof. You won’t know how much you can safely trim without finding this landmark. Trimming ANY part of the hoof without having found the apex of the frog first will result in an immediate stop and fail. If you don’t know where you are, how do you know where you are going?


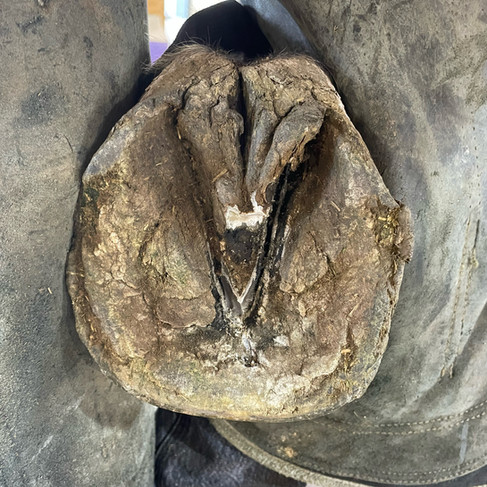
4. With your knife, trim the back of the frog to open the collateral sulci.
Why: Trimming the back of the frog is necessary to assess heel height and length, as well as balance. The back portion of the frog can become overgrown and fill the collateral sulci in the back of the hoof, this will cause the heel and frog to "blend" into one structure. If this extra growth is not trimmed out, you cannot safely and correctly trim the heels to the appropriate length, nor can you achieve balance. Remember: the heels and frog are two separate structures; there should be a clear distinction between the two.


5. With your knife, trim the central sulcus.
Why: overgrown frog that is filling the central sulcus should be trimmed out to prevent central sulcus thrush infections.
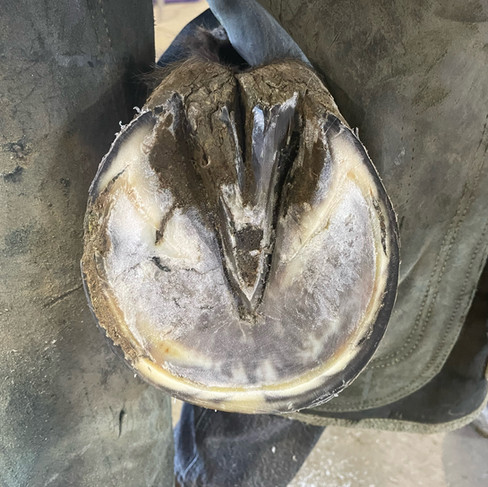
6. With your knife, (or nippers, if there is a lot of false sole) trim any excess sole. On long feet that require a lot of work, you may use your knife on the entire solear plane. On short feet, it is recommended to focus on the portion of hoof closer to the white line.
Why: the sole is the coffin bone's chief line of defense against ground impact. Excessively paring the sole from the area immediately around the frog will rob the coffin bone of important protection. When removing sole, focus initially on the excess material immediately behind the white line: excess sole should be removed from this area to minimize sole pressure, and to allow you to run your nippers and rasp easily across the hoof .


7. Run your nippers across the hoof to remove excess hoof wall length. Remove any sole pressure around toe and quarters around the white line, as well as from the seat of corn. This is particularly important if the horse is being prepped for shoes.

8. Use your rasp to level the plane of the hoof. Remove any high spots and ensure the heels are the same height and length. Then, use your rasp to define the perimeter of the wall. The hoof wall should follow the shape of the white line, and should be roughly the same thickness all the way around. With your rasp, round and define the perimeter of the hoof. Do not create any straight lines or corners with your rasping: the shape of the hoof should mirror that of the coffin bone. There are no straight lines or corners in a coffin bone.


Bring the hoof forward onto the stand and dress any remaining flares. Your rasp marks should be limited to the bottom third of the hoof. Do not over-rasp a hoof in an attempt to “clean it up” from dirt. You can use your wire brush and a sanding block if you wish to get a hoof to look uniform all the way to the coronary band.
IMPORTANT: Flares can be removed at the beginning or end of the trimming process. Either way, ensure you do not remove so much wall thickness that you cannot safely apply a shoe. You may not always be able to remove all flare at once.


Shoeing
Shoe Selection
1. With your tape measure, measure the perimeter of the trimmed hoof from heel to heel.
2. Add ½ inch to the measured number. For example: if the perimeter of the hoof measures 14 inches from heel to heel, the shoe must measure at minimum 14 ½ inches from heel to heel in order to fit that hoof.
3. You must familiarize with different types of shoes and their function and purposes in order to select the correct model that will suit the needs of the horse that you are shoeing.


Check out the following articles and online tools to learn more:
Shoe Shaping
IMPORTANT:
Your shoe must meet the following requirements:
1. Cover the buttresses
2. Nail holes must fit the white line
3. Leave appropriate expansion
4. No sole contact
5. Flat and level

1. Always start by shaping the toe of the shoe. If the toe of the shoe and that of the hoof do not match, the shoe will never fit the foot correctly. If the toes match, fitting the rest of the shoe to the hoof will be much easier.

2. Once the shape of the toe of the shoe matches that of the hoof, move on to shaping the quarters.

3. Once the shape of both toe and quarters are a match, move on to shaping the heels.

Leveling and Flattening Shoes
1. Hit the inner rim of the shoe on the foot side with overlapping blows.
2. Hit the outer rim of the shoe on the ground side with overlapping blows.
3. Check or “sight” for flat and level.
4. If not flat and level, repeat steps 1 and 2.

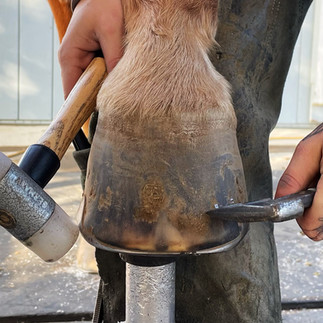
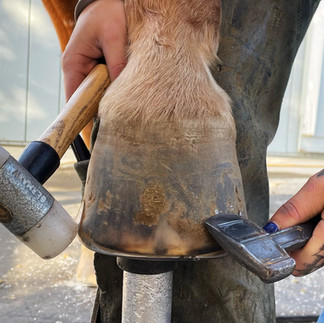
Burning Shoes
Once you feel confident that the shape of your shoe is close enough to that of the hoof, and your shoe is flat and level, take the shoe at a dark-red heat to the hoof and smoke it. If you have correctly leveled your shoe, and correctly flattened and leveled the hoof, you should get an even burn mark all the way around. Unburnt areas will highlight trimming and shoe leveling issues.
Any burn marks on the sole beyond the white line indicate sole contact between the hoof and the shoe. You must use your knife to remove the burnt sole and relieve sole pressure.

Nailing Shoes
Before nailing your shoe on the hoof, you must ensure that you have met the five goals mentioned previously. The shoe must cover the buttresses, the nail holes must fit to the white line, there must be an appropriate amount of expansion, there must be no sole pressure, and the shoe must be flat and level.
If your shoe meets all of these requirements, it can be safely nailed onto the hoof.
Clipped vs. Unclipped
When using clipped shoes, you can set the shoe in the exact position you wish to nail it on the foot, as the clips will prevent it from sliding back as you hammer the nails in.
With unclipped shoes, on the other hand, you must account for the shoe “sliding back”.

Nail height
A sound, strong nail should exit the hoof wall somewhere in the area outlined below. Any nails below that will be weak, and will compromise the integrity of the hoof wall. Any nails above that, though they may not be an issue to the horse, are likely to concern owners.

Nail pitch
In order to drive sound nails that will exit at the appropriate height, the nails must be “pitched” at the correct angle. The angle of the nail should match the angle of the hoof wall.
Finishing
Once the shoe has been nailed on, you can bring it forward on the hoof stand to “finish” it. You must work on the hoof stand diagonally, so you will have to switch sides and walk around the stand to work on the medial and lateral sides of the hoof.
1. Fold, wring, or lay your clinches against the hoof wall. You may choose different methods depending on the horse’s ability to safely stand for you (e.g.: do not lay nails against the hoof wall on horses that like to pull their feet away from you).

2. Bend the portion of nail exiting the hoof at an approximate 90-degree angle in relation to the hoof wall.

3. Cut the nails, leaving only a very short portion sticking out from the hoof wall. Short clinches are stronger than long ones.

4. With your rasp, lightly remove the bulge in the hoof wall immediately under the nail. This bulge forms as the nail exits the hoof, and by the force you exert on the nail as you fold it/wring it/cut it.
The goal is NOT to leave any marks in the hoof wall as you do this. The purpose of this step is to prep the portion of the hoof wall under the nail for gouging.

Gouging
The purpose of gouging is to create a small indentation immediately under the nail for your clinch to sit into. Clinches should not sit on top of the hoof wall, but rather inside of it. Gouging is the way to achieve this.
1. Place your gouge under the nail. The size of your “scoop” should match that of your clinch. Depending on how long or short you have cut your nails, and depending on the size of the nail itself, you will have to adjust how much hoof wall you will be gouging out. Remember that your goal is to fit your entire clinch in the small hole created by your gouging.
2. Push inwards toward the center of the hoof to lock your gouge in place, then push in and up to scoop a small chunk of hoof wall out from under the nail.


Clinching
1. Place the flat jaw of your clinchers under the hoof and over the head of the nail you are looking to clinch. The bottom rein of your clinchers should run parallel with the plane of the shoe.
2. Place the curved jaw of your clinchers over the portion of nail sticking out from the hoof wall.
3. With a very light squeeze, fold the clinch into the space you carved out with your gouge. This should require very little force. Too much pressure will cause you to rake downward and over-fold your clinch.
4. Re-position the curved jaw of your clinchers over your newly-folded clinch. Squeeze and press the clinch inwards, as you were trying to push the clinch inside the hoof. Do not rake the clinch downwards.


5. Once you have clinched all your nails, you may rasp your clinches. The purpose of rasping clinches is to remove any sharp edges, NOT to rasp the clinches off. If you have gouges and clinched correctly, only a very small portion of your clinch will be sticking out from the surface of the hoof wall.
A few light rasp strokes with your finishing rasp should be all that it takes to accomplish this.
If you find yourself having to rasp a good chunk of your clinch off in order to create a smooth surface on the hoof wall, work on improving your gouging and clinching skills.
6. With your finishing rasp, remove any unsightly marks that may have been left on the hoof while dressing or clinching.
You can use a sanding block to clean up your hoof before applying any dressing or sealants.


Comments